Download Print Friendly Version: English Dutch Hungarian Italian Russian Polish Chinese German Czech Swedish French Spanish
How to Guide - Exposing Capillex
Synopsis...
Under exposure is the single biggest cause of stencil breakdown on the press. Follow this simple guide on how to optimise the exposure time
Once Capillex has been adhered to the mesh and dried, it is ready for exposure. The objective with exposure is to penetrate the photostencil material all the way through to the mesh to ensure hardening around the filaments and thus obtain good stencil adhesion whilst accurately reproducing the detail on the film positive.
Under Exposure
If the exposure is not enough and the whole layer is not penetrated by the UV light, the stencil may wash completely off on washout. Or, more typically the stencil may be intact after washout, but break down or become tacky during the print run - both of which are symptomatic of under exposure.
Over Exposure
As a general rule, "direct" systems do not suffer from a lack of flexibility on over-exposure, in fact, if anything, the adhesion to the mesh is improved. However, the resolution and definition of the image deteriorate as the stencil is over exposed. Also see sections on light geometry and mesh influences.
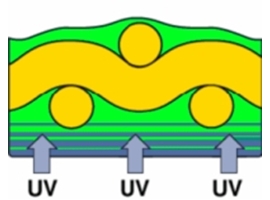
The following diagrams outline the effects of under-exposure at 1/4, 1/2 and 3/4 of the optimum exposure for a direct stencil.
1/4 Optimum Exposure
EFFECTS: During washout the image would appear and the stencil would probably start to come away during washout
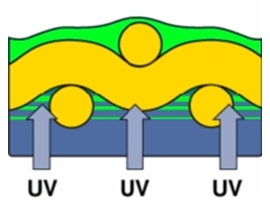
1/2 Optimum Exposure
EFFECTS: The stencil would probably be damaged by a strong washout spray. The emulsion appears soft on the squeegee side.
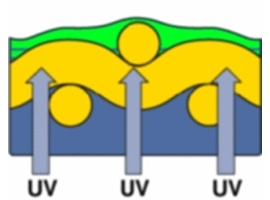
3/4 Optimum Exposure
EFFECTS: Emulsion appears slightly soft on squeegee side.Stencil will leave ‘scum’ in the open areas if not washed out properly. Durability is reduced. Stencil is harder to decoat.
Optimum Exposure
EFFECTS: All the emulsions is fully hardened and the stencil will provide the optimum resistance and durability

Autotype Exposure Calculator
What is the Autotype Exposure Calculator? The exposure calculator is a film positive comprising of five columns, each with a resolution target, a set of halftone tints and lines of text. Four of the columns are backed with a grey neutral filter of different density. This concept enables five different exposures to be made simultaneously.
Why use the Autotype Exposure Calculator? Incorrect exposure is one of the most frequent causes of stencil failure. The Exposure Calculator provides a quick, accurate determination of exposure times with all photostencil systems to alleviate this problem. It can also be used as a printing aid to optimise print quality, or as a means of process control.
How to use the Autotype Exposure Calculator?
1. Estimate the correct exposure time using the guidelines available. Then DOUBLE it.
2. Expose the photostencil to the Exposure Calculator in the normal way, washout and dry thoroughly.
3. Examine the stencil to determine the correct exposure time. Interpretation of correct exposure depends on the stencil system.
Reading the results of the exposure test - Capillex
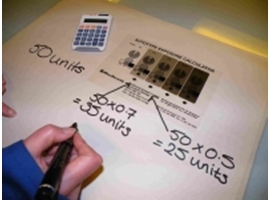
The stencil will show variations in colour from one factor to the next. Follow the colour change from the lightest to the darkest until it stops. The factor where the colour change stops is the column that represents optimum exposure. Once the correct factor has been chosen, multiply the factor by the test exposure time. This gives the correct exposure time (or number of units) for that particular stencil/mesh/light source combination.
example: 0.7 x 50 units = 35 units
Correct factor x test exposure = Correct Exposure
If there is still a colour change between Factor 0.7 and Factor 1, this indicates an under-exposed stencil, DOUBLE the original test exposure, and repeat the test.
Reading the Results of the Exposure test - Capillex 30 (photopolymer)
Determining the correct exposure with Capillex 30 is slightly harder than with the other Capillex films as it is a pure photopolymer film and therefore there is no Diazo colour change to guide you. However, the same basic guidelines apply with photopolymer stencils, that underexposure will lead to a weak stencil, whereas fine detail/definition will fill in on over exposure.
Step 1
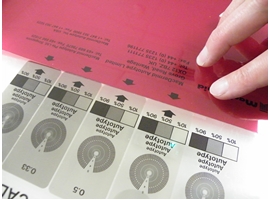
Expose the stencil using the Exposure Calculator. It is good practice to blank off the bottom of the calculator using either Automask Ruby or a sheet of black paper. This will create an open area of mesh immediately below the targets for the rub test.
Step 2
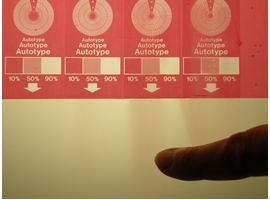
While it is still wet, rub the squeegee side of the stencil over the different factors. If the emulsion feels soft and is easily removed then it is under exposed.NB it is possible to wash away this soft emulsion using a long/strong wash out from the squeegee side so do not over-develop the test screen.You can see from the image below how the soft emulsion from the 0.25 factor has been drawn out into the open mesh (B) to give a noticeable stain. The degree of softness is less at the 0.33 factor (A) and less emulsion is drawn out. At the 0.5 factor on this stencil the emulsion on the squeegee side has been hardened and the stencil is fully exposed
Step 3
Dry the screen and examine the targets. Determine which factor resolves the finest line you need to print? NOTE it will be impossible to resolve the fine detail at the centre of the target using a white mesh and exposed to a bank of Fluorescent tubes!
Using a combination of stencil hardness (through cure) combined with resolution, it is possible to determine which factor will give the best result for your application. Multiply your test exposure time by this factor to establish the optimum exposure time.
The Exposure Calculator as a Printing Guide
The exposure calculator can be used to assess printed edge definition (straightness/ clarity of the printed edge) and print resolution (fineness of detail achievable).
The target is designed to allow the user to select the best angle to position the film positive stencils in order to avoid " saw tooth" and mesh interference. Resolution is checked by assessing the degree of "filling in " at the centre of the target.
Halftone Tints
The 10% and 90% areas can be used to gauge the degree of highlight dot loss and flooding of shadow areas respectively.
The use of a square dot configuration means that the corners of the dots just meet at 50%. Examination of a print will show at a glance whether there is dot loss or dot gain in the mid-tone.
Failure of the corners to meet indicates dot loss. This may be due to undercutting caused by over-exposure, poor light geometry, drying in of ink, or the choice of a low resolution photostencil.
The merging of dots, or thickening of the join between dots, indicates dot gain. This is due to flooding which may be caused by over-thinning of ink, or by the use of a photostencil with poor edge definition. Before starting a print run with halftones, it is always recommended that a test strip is printed, which contains a full range of tone values in the selected dot count.
NB: Positives with square dots are not recommended for fine halftone printing.
Change in Exposure Time for New Lamp Distance
Once the exposure has been fixed for a specific film it should be maintained. If the distance between the light source and the film changes, the exposure must be changed accordingly, unless of course, an integrator is used and the exposure time is changed automatically.
Choosing the Right Light Source
As a general rule, the minimum distance between the exposure lamp and the vacuum frame should be equal to the diagonal of the area to be exposed. This will ensure fairly even illumination over the exposure area.
Light Sources
Most modern light sources are based on gas discharge, each type having specific advantages and disadvantages.
Spectral Output of Light Sources
In general terms a light source with a spectral output in the region of 340-440 nM (nanometers) is suitable for exposing photostencil materials. Some light sources have a continuous output, whereas others have a discontinuous or line emission. Modern light sources such as metal halide lamps have a line output and it is important that these emissions coincide with that portion of the sensitivity curve of the photostencil materials, giving the best results in terms of tanning and image contrast i.e. diazo bulbs or photopolymer bulbs.
Choosing a Light Source
Factors in selecting a light source:
a) spectral output
b) consistency and power
c) geometry of the source (i.e. its size and position relative to the image area)
d) evenness of illumination over image area
e) capital and running costs
The following is a list of the more popular light sources that are used today starting with the least powerful.
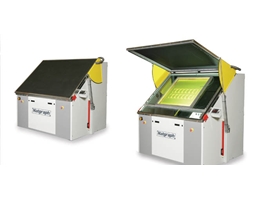
Image courtesy of Natgraph Ltd
(A) UV Fluorescent Tubes
These are used in some printing down frames and have the advantage of pure UV without producing heat. But because their output is very low they have to be used in banks very near to the photostencil with consequent problems of light undercutting. If considering UV fluorescent tubes as a source, ensure that their output is suitable, i.e. between approximately 340-440 nM, blue tubes used in sun beds a
Even using dyed mesh UV tubes are only suitable for low resolution
re the best choice.
(B) High Pressure Mercury Vapour Lamp
The HPR lamp works by vaporising and ionising mercury which normally takes 2-3 minutes from switch on. Once the lamp has been switched off the mercury condenses before it can be vaporised again.The HPR lamp has a relatively low output and a line spectrum with high peaks in the ultra-violet and blue regions. When exposing large areas a number of lamps must be used with consequent undercutting problems and areas of uneven exposure.The HPR lamp normally has a life of about 1000-1500 hours, after which the UV output tends to fall off. A practical light source for small stencils and the hobbyist.
(C) Metal Halide Lamp
Metal Halide lamps are now the industry standard and are recommended by MacDermid Autotype as the most practical light source to use. They consists of a quartz envelope containing mercury through which a current passes, vaporising the mercury. Like the HPR lamp, it has a discontinuous line spectrum and requires a restart time, although instant start models are now common. With the addition of metal halides it is possible to adjust the spectral output within the UV and blue parts of the spectrum.The lamp has an average life of around 1,000 hours. It is ideally suited to the exposure of photostencils - clean, efficient and fast because of its relatively high power and high UV output. Different doping materials are used to produce 'Diazo', 'Photopolymer' or 'Universal' bulbs depending on your requirements.
Light Integrators
Timing an exposure is not the most accurate way of ensuring that the stencil has received the correct amount of light. A light integrator will compensate for these variations, since the exposure is controlled by the amount of light falling on a photocell placed on a vacuum frame. An additional advantage of the light integrator is that, regardless of lamp position, once an optimum exposure level has been found, no further adjustments are required.

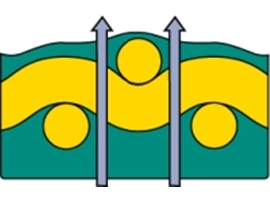
Mesh Effects on Exposure
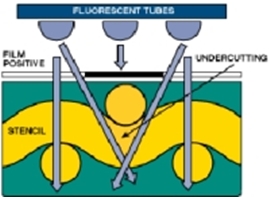
When exposing Capillex, treat the photostencil and mesh as a complete entity because of the influence of the mesh on light scatter. This affects both resolution, definition and exposure level.The diagram below shows the light scatter caused by white mesh. Scatter increases with the increase in mesh count and exposure time. As this can cause considerable loss of resolution and definition it is recommended that dyed meshes are used, especially when reproducing fine detail.
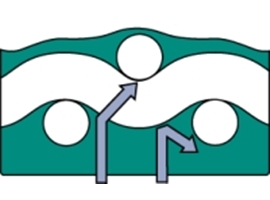
Dyed meshes absorb the UV light, thus minimising light scatter hence exposure times have to be increased by 50-150% over the times used for white mesh.
Vacuum Frames
The contact between the positive and the photostencil should be as perfect as possible, as inadequate contact results in light undercutting. Particles must not be trapped between the two surfaces and if using large vacuum frames fitted with flexible rubber blankets allow sufficient time for all the air to be exhausted. In some cases the blanket can become stretched, especially after processing many direct stencils. It may be necessary to use a piece of flexible tubing near or around the positive and connected to the blanket vacuum inlet to insure proper air evacuation by channeling the air.
Light Source Geometry
The photographic properties of photostencils which are influenced by exposure are resolution and definition. Resolution is taken to be the limit of reproduction achievable i.e how fine a line can you resolve. Definition is the reproductive quality, for example, the straightness of edges of print.
Light Spread
Photostencils are designed to obtain a specific resolution, but once they are over-exposed, light spread in the emulsion will reduce this resolution ; i.e. open areas will start to close in. This is influenced by mesh colour, film positive contact and angles at which the UV enters the stencil.
Light Source Geometry
If the light rays passing through the positive and photostencil material emulsion are not parallel, changes will occur in the image reproduced in the photostencil. This is often referred to as light undercutting. From a practical point of view, poor light geometry effects do not present a problem when processing general work, i.e. lettering down to about 6 point and halftones of 65 lines (25 cm) or coarser. It is only when trying to accurately reproduce very fine line halftones or images, that attention must be paid to light geometry.
Factors Influencing Light Geometry
(a) Size of the light source. The larger a source, the greater becomes the angle of light rays traveling from its edges and therefore the degree of undercutting.
(b) Position of the light source. The nearer a light source is to the vacuum frame the greater is its effective size. Conversely if the lamp is moved further away, so its effective size is reduced. It is good practice to increase lamp distance when exposing very fine detail work to reduce the effect of light undercutting if at all practical, (do not forget that the exposure time will have to be adjusted if an integrator is not fitted).
Positive Quality & the Absorption of Film Bases
Top tip: The film positive determines the image quality of the stencil.
For optimum results use single-layer positives with the emulsion side in contact with the photostencil during exposure. This ensures that light undercutting will be restricted and that the stencil will be uniformly exposed. It will be noted that a normal 100 micron (0.004") polyester film base absorbs a high proportion of the UV light. So when using stripped up positives with two or more layers of film plus adhesive tape, considerable variations in stencil exposure will result. Exposure times have to be adjusted accordingly for the best overall result. Multi-layer positives increase the amount of spotting-out time so careful consideration should be given to the real cost differences between single and multi-layer positives.
Washout
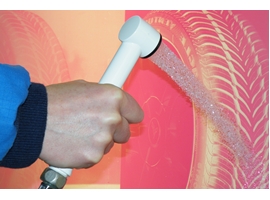
When correctly dried and exposed, Capillex stencils are very tough and will withstand extremes of washout conditions. As a rule, Capillex stencils benefit from a 'short, sharp' washout using a strong spray of cold water, predominantly from the print side of the screen.
If the mains water pressure is too low to achieve a strong spray, then a high pressure gun can be used, ideally set with a diffuse spray and held at a minimum distance of 80 cms from the stencil.
NOTE As high pressure guns are available in many different powers it is important to test the jet on a non-printing area before processing a production screen.
If the screen is small enough to be handled easily then the ideal washout process is turn the screen during washout so the emulsion from the image areas is rinsed clean from the squeegee side though the bulk of the washout should take place on the print side.
Pre-Soak
Although tempting pre-soaking a small screen prior to washout may cause problems due to the softening effects that soaking can have, especially on thicker stencils that have been under exposed.
Download Print Friendly Version English Dutch Hungarian Italian Russian Polish Chinese German Czech Swedish French Spanish


