How to Guide - Processing Five Star indirect stencil film
Synopsis...
Processing for Five Star and other gelatine indirect photostencil films
Five Star and Alpha Star gelatine indirect films are all quick and easy to process with the need for minimal equipment. Open the video for a simple step by step guide on how to process these films. Please note these three films are all processed in basically the same way, though they will require slightly different exposure times.
Processing Guide
- Prepare mesh
- Expose
- Chemically harden
- Washout
- Mount on prepared screen
- Blockout
- Dry and remove base support
- Retouch
Handling
The films should be handled under yellow fluorescent lighting and returned to their container after cutting off the required length.
Do not kink the film as the emulsion may delaminate from the base and inhibit exposure of this damaged area.
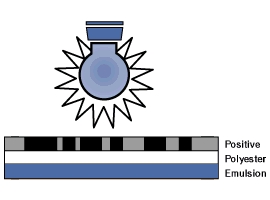
Exposure
Place the base support of the photostencil in contact with the emulsion side of the positive.
Expose to an ultra violet light source. Correct exposure can be checked with the Autotype Exposure Calculator. Use the table below to give an indication of the exposure times for the films to various light sources.
Over exposure will lead to a thick brittle stencil with poor flexibility and adhesion.
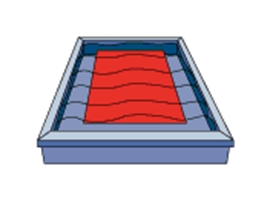
Hardening
Immediately after exposure, evenly immerse the film in the hardening solution for 1 minute. This should be at a temperature of 19-21°C (66-70°F) and should ideally be made up from Autotype Activator Powder (instructions on container).
Hydrogen peroxide can also be used with a 1.2% solution (equivalent to 4.0 volumes) at the same temperatures.
Washout
Use a fine spray of water at a temperature of between 40-45°C (105-115° F). Evenly wash the entire stencil. Continue washout for at least 30-60 seconds after the image has appeared then chill the stencil with cold water; 15-20°C (60-68°F) for 10-15 seconds.
Do not use excessive water pressure as this will result in thin weak areas of stencil. The same water pressure and temperature should be used to obtain consistent stencils.

Degreasing
Always use a freshly degreased screen and make sure that it is thoroughly rinsed with cold water imediately before the film is applied to the mesh.
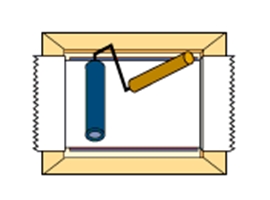
Mounting
Take a raised pad (glass or plastic), slightly smaller than the inside of the frame to be used, ensuring that it is free from high spots.
Lay a sheet of absorbent paper (newsprint is ideal) on the pad and then place the freshly rinsed stencil film, emulsion side up, on top of this. Position a well prepared, degreased wet screen on to the wet stencil film.
Using a soft paint roller firmly apply four or five separate sheets of clean newsprint to absorb all surplus moisture. Failure to remove moisture from the open areas will cause scumming.
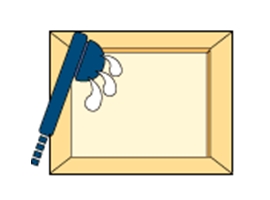
Drying
Blockout the open area between the stencil and the frame with one of Autotype’s water based screen fillers while the stencil is still wet; this will help registration.
Ideally drying should be under ambient conditions. This may be accelerated with a fan and warmed air up to a temperature of 30°C (86°F). High temperatures, especially at lower humidities will cause edge curling, brittleness and lack of adhesion.
In conditions of high humidity, it may be necessary to use warm air for complete drying. The stencil is normally dry when it looks uniform in density. When it appears dry it should be checked by gently peeling one corner of the base film.

Exposure Guidelines
Lamp |
Distance |
Five Star |
Alphastar |
|
5 k/w Metal Halide |
120 cms |
2 - 3 mins |
2 - 3 mins |
|
2 k/w Metal Halide |
120 cms |
1 - 5 mins |
4 - 5 mins |


